When we were preparing for The RV Project part deux, Spenser and I decided to downsize. Goodbye 30 foot trailer, hello little just-big-enough-for-two 10 footer. Going from a house to a bedroom meant downsizing everything, including our cookware. We decided we only needed one pan to cook with and, more significantly, we were going to be all hippy about it and forgo the Teflon.
You really want something non-stick when on the road, so cast iron seemed like the best choice. I did some minimal research about how to season a cast iron pan (make it non-stick) and, at a quick glance, it seemed pretty simple. Neither of us had owned cast iron cookware before, but how hard could it be?
Boy, was I wrong.
Spenser came home with a brand-new Lodge Logic cast iron pan from Jax Outdoor Gear, very reasonably priced at around $25. It came pre-seasoned per the label, but the saleslady at Jax told Spenser to at least season it once more before using it. The saleslady had instructed Spenser to rub the pan down with oil and then run it through the ‘clean’ cycle on the oven. Naturally, the clean function did not work on Brad’s oven, so I sat down to do my own research on how to season the pan.
Down the Google bunny hole I went. Apparently, everyone on the internet has an opinion on the best way to season a cast iron pan.
There’s this guy:
He thinks he’s got the answer, but I didn’t trust him for some reason…
After some more digging, I thought I had found the answer.
This lady had really done her research – read her post if you would like the chemical explanation of how to best season a cast iron pan. Although I appreciate all of the forethought and research that went into her blog post, I wasn’t ready to commit to buying flaxseed oil for $17 per ounce. Especially when many people online had seemingly good success with almost any type of cooking oil.
I tried seasoning the pan only once, since it already came pre-seasoned, but it was nowhere close to non-stick after the first round. (Eggs are the best test.) So I scrubbed the pan down and started over again. This time, I followed the scientist’s directions to a T, except for using canola oil instead of flaxseed oil.
After 6 rounds and 18+ hours, my pan was seasoned. Right?
Wrong. Partially.
The pan works pretty well, but it is not evenly seasoned. In the beginning, some parts would wipe off cleanly, while others needed a good scrubbing. This, I assume, is due to the nature of the pan (see rule #1 below).
After all this, here are my rules for seasoning a cast iron pan.
#1 – Buy vintage, if possible. Vintage (pre-WW2, specifically) cast iron cookware has a smoother surface due to quality of iron ore AND the machining that is no longer done due to labor expense. Also, they have likely been used (and seasoned) over and over again, which means the job is done for you.

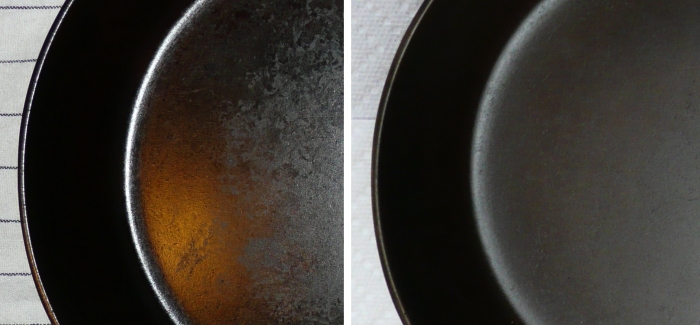
On the left is a Lodge 8SK 10.5″ skillet. On the right is a Favorite Piqua Ware skillet of the same size. The Lodge is probably 16 years old while the Favorite is at least 74 years old. I don’t know the exact date of manufacture for the Favorite but the Favorite factory shut it’s doors in late 1934, a casualty of the Great Depression. Taken from this post.

When shopping for a vintage Wagner (considered a top-notch vintage brand, along with Griswold), be wary of this logo. This line of cookware was actually manufactured between 1991-1999 and not 1891 (it just commemorates Wagner’s 100th anniversary). For more on the history of Wagner and Griswold, check out this post.
#2 – Dry the pan. The pan must be bone dry before you apply the oil. This is one of the most important tips I found out, otherwise the oil will not harden on the pan properly (or evenly). It is helpful to dry the pan with a towel and then place it in the oven at about 200 degrees for 10-20 minutes. This will guarantee that your pan is dry, dry, dry before you begin.
#3– Don’t use too much oil. Again, people have their opinions on what the best type of oil is. I used plain old canola oil because that is what we had. The most important note about the oil is to not use too much. Rub it on with your hands or a paper towel and rub it almost completely off with a paper towel. You want the thinnest layer possible so that it will harden evenly and not leave a sticky residue.
#4 – Use high heat. Pretty much as high as your oven will go (or use the clean setting).
#5 – Go through the seasoning cycle once and if it looks like the pan on the right, you’re good. If not, do the process again.
Finding a high quality vintage cast iron pan that someone wants to let go of is not the easiest of tasks. So, if you ended up buying a new cast iron pan like us, here’s a few tips that we’ve found helpful at keeping it as non-stick as possible:
– Before you cook, heat the pan up for a bit and then spread an even layer of oil over the pan and heat that up for a few more minutes. This really helps food not stick to the pan.
– Clean the pan as soon as you can after you have finished cooking. Immediately is best, but as soon as possible is okay.
– Use hot water to clean the pan, or boil water if you are like us and do not have a hot faucet.
– Use a stiff bristled plastic brush with NO soap to scrub the pan. Soap is the devil when it comes to cast iron, it essentially cleanses away the seasoning that you just worked so hard to make.
– Wipe it dry as soon as you are done cleaning it and rub a thin layer of oil over the inside of the pan before you store it away. Rubbing the oil on only works if the pan is still quite warm (pores open). If you’re living on the road like us, don’t worry about the layer of oil, it doesn’t really harden on the pan if the pan is rinsed with cold water.
The good news is that after a few weeks of almost daily use following the tips above, our Lodge Logic pan has become increasingly non-stick! There are still parts of it that stick less than others, but overall we are very happy with it. Goodbye, Teflon! Alright, I think that’s all I have to say about cast iron. ‘Till next time!


I’ve always seasoned cast iron by putting about an eight inch of salt and oil, a paste of it, in the pan and heating it up to smoking hot for a while. It glazes the pan quite nicely.
Happy holidays and safe travels!
Thanks for the tip, Dave! Will have to try that next time. Happy holidays to you too! And, as I’m sure you are also traveling somewhere great, safe travels!! Hope you and the rest of the NIMBY gang are doing well.
Nice job on presenting solid advice when there’s so much passionate silliness about this simple topic online. For easiest clean up, remove all food from cast iron pan directly after cooking is finished, use “plastic pan scraper” to remove any stuck bits or film, wipe vigorously with paper towel or re-usable! cotton rag, now using fingerstips or paper towel apply super thin layer of oil and make sure to get it in the edges and up the sides too.
And…. if you always put some oil (coconut oil is awesome) in the pan while it’s heating up, cleanup will always be much easier.
Avoid teflon since it’s made from PTFE and there’s concern this will be linked with health concerns, in the future.
Thanks for the tips, David! We actually just started coconut oil and LOVE it! Definitely the best for keeping the cast iron clean. The small amount of added work is definitely worth the peace of mind that comes from avoiding Teflon.
I have my Grandmother’s cast iron skillet that has to be at least over 100 years old as she passed away in 1963 at the age of 93. The only markings on the bottom is XX on the handle side and either a 6 or 9 on the opposite side. The pan measures a little over 11 inches from pour spout to pour spout. Do you have any ideas on the manufacturer of this pan? It is very special to me and I would love to learn more about it. Thank you so much.
Hi Pat, not too sure about that one. Maybe an antique store would be able to point you in the right direction. Do you still use it to cook?
It is a number 9 skillet and not a 6. If there is a metal mark on the bottom, gate mark, it is generally speaking made before 1890. It is hard to date them before this time or determine their manufacturer.